Sweet potatoes are one of the most forgiving crops you can grow — they tolerate poor soil, shrug off short dry spells once established, and reward minimal effort with a generous harvest. The one thing that trips up first-time growers is that sweet potatoes aren’t planted from seed at all. Get that part right, and the rest is mostly patience.
Quick answer: Sweet potatoes are grown from rooted vine cuttings called “slips,” planted into warm, loose, well-drained soil after the danger of frost has passed (or, in Kenya, at the start of the long rains). Space slips 12–18 inches apart in mounded rows 3–4 feet apart, keep them consistently watered while establishing, and expect a harvest in 90–150 days depending on variety.
Here’s the full process from start to harvest.
What You’ll Need
- Sweet potato slips — rooted shoots grown from a mature sweet potato, available from nurseries/agro-vet shops or grown yourself (see below).
- Well-drained, loose soil — sandy loam is ideal. Heavy clay produces misshapen, stunted tubers.
- Full sun — at least 6–8 hours a day.
- Compost or well-rotted manure — sweet potatoes don’t need rich soil, but organic matter improves structure and moisture retention.
- Mulch (straw, grass clippings, or black plastic) — optional but helpful for weed control and moisture retention.
Step 1: Get or Grow Your Slips
Sweet potatoes don’t come true from seed in a way that’s useful for home growing, so almost everyone starts with slips — small rooted plants grown from a mature tuber.
Buying slips is the simplest route: agro-vet shops, KALRO-affiliated nurseries (in Kenya), or garden centers (elsewhere) sell certified, disease-free slips ready to plant. Certified slips matter — starting with disease-free planting material is one of the biggest factors in a healthy, high-yielding crop.
Growing your own slips takes about 6–8 weeks:
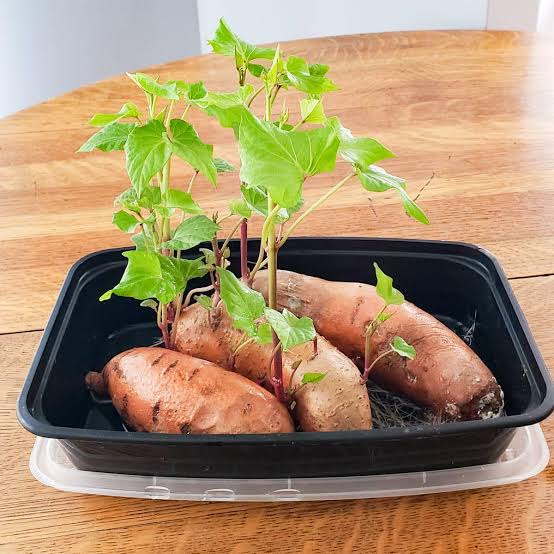
- Suspend a healthy, firm sweet potato halfway in a jar of water (toothpicks through the sides hold it in place), pointed end down.
- Keep it on a warm, sunny windowsill and top up the water as needed.
- Within a few weeks, shoots (slips) will sprout from the top, eventually growing their own small roots.
- Once slips are about 6 inches long with several leaves, twist them off the parent potato and place the cut ends in water for a few days until roots develop, then they’re ready to plant.
Step 2: Choose the Right Time to Plant
Sweet potatoes are a warm-season crop and are sensitive to cold — they will not tolerate frost, and growth stalls in cool soil.
- In temperate climates (US/UK growing guides): Wait until 2–3 weeks after your last expected spring frost, once soil temperature is reliably above 16°C (60°F).
- In Kenya: The ideal planting window is at the start of the long rains (March–May), which gives young plants reliable moisture during establishment. Planting is possible year-round in irrigated areas, but rain-fed planting should align with the rains to avoid losing slips to drought stress in the first few weeks.
Step 3: Prepare the Soil
- Choose a sunny, well-drained site — sweet potatoes sulk in waterlogged soil and are prone to rot if water sits around the roots.
- Loosen the soil to a depth of about 12 inches (30 cm), removing rocks and large clumps.
- Work in a moderate amount of compost or well-rotted manure. Avoid heavy nitrogen fertilizer — too much nitrogen grows lush vines at the expense of tuber size.
- Form the soil into ridges or mounds about 8–10 inches (20–25 cm) high. Ridging is the standard method in both home gardens and commercial Kenyan production, because it keeps the developing tubers in loose, well-drained soil and makes harvest easier.
Step 4: Plant the Slips
- Space slips 12–18 inches (30–45 cm) apart within the row.
- Space rows 3–4 feet (90–120 cm) apart — the vines spread widely as they grow.
- Plant each slip so that 2–3 leaf nodes are buried in the soil, with just the top leaves above ground. Roots and tubers form at the buried nodes, so deeper planting (within reason) generally means more tubers per plant.
- Water immediately and thoroughly after planting to help the slips establish.
Step 5: Water and Care During the Growing Season
- First 2–3 weeks: Keep soil consistently moist while slips establish roots. This is the most vulnerable stage.
- Once established: Sweet potatoes become fairly drought-tolerant. Water deeply about once a week if there’s no rain, but avoid constant wet soil — it encourages disease and can reduce tuber quality.
- Last 3–4 weeks before harvest: Reduce watering. Slightly drier conditions toward the end of the season actually improve flavor and storage quality.
- Weeding: Keep the bed weed-free for the first 4–6 weeks. After that, the sprawling vines shade out most weeds on their own.
- Mulching: A layer of mulch helps retain moisture and suppress weeds, especially useful in hotter climates.
Common Pests and Problems
| Problem | What to look for | What to do |
|---|---|---|
| Sweet potato weevil | Tunneled, bitter-tasting tubers; small holes in vines | Use certified clean slips, rotate crops, hill soil to cover exposed tubers, harvest promptly at maturity |
| Aphids | Curling leaves, sticky residue on vines | Encourage natural predators, spray with insecticidal soap if severe |
| Whiteflies | Small white insects on leaf undersides | Yellow sticky traps, insecticidal soap, avoid overcrowding plants |
| Root rot | Yellowing vines, mushy tubers | Improve drainage, avoid overwatering, use ridge planting |
| Voles/rodents | Gnawed tubers near harvest | Harvest promptly once mature, use traps if persistent |
The sweet potato weevil is the most economically damaging pest in most growing regions, including across Kenya. Because it spreads through infected planting material and soil, the best defenses are starting with certified slips, rotating where you plant sweet potatoes each season, and not leaving mature tubers in the ground longer than necessary.
Step 6: Harvesting
Most varieties are ready 90–150 days after planting, depending on the variety — fast-maturing types can be ready in around 3 months, while some traditional varieties take closer to 5–6 months.
Signs it’s time to harvest:
- Leaves begin to yellow.
- The soil around the base starts to crack slightly, hinting at tubers swelling underneath.
- You’re approaching the days-to-maturity listed for your specific variety.
How to harvest:
- Choose a dry day — wet soil makes tubers harder to dig and more prone to bruising.
- Cut back the vines first to make digging easier.
- Dig carefully with a fork, starting well back from the base of the plant to avoid spearing tubers.
- Handle tubers gently — sweet potato skin is thin and bruises easily right after harvest, which shortens storage life.
Curing and Storage
Curing is the step most beginners skip, and it makes a real difference in both flavor and how long your harvest lasts.
- Keep freshly dug tubers in a warm, humid spot (around 27–30°C / 80–85°F with high humidity) for 5–10 days. This heals small cuts in the skin and converts some starches to sugars, improving sweetness.
- After curing, store in a cool, dry, well-ventilated spot (around 13–16°C / 55–60°F) — not the refrigerator, which damages flavor and texture over time.
- Properly cured and stored sweet potatoes can keep for several months.
Growing Sweet Potatoes in Kenya: Regional Notes
Sweet potato is a major food-security crop across Western Kenya, Nyanza, Eastern Kenya, and parts of the Rift Valley, prized because it tolerates poor soils and erratic rainfall better than most staple crops.
Recommended varieties: KALRO, in partnership with the International Potato Center (CIP), has released several improved varieties suited to different regions:
- Kenspot 1 — early maturing, suited to drier areas.
- Kenspot 2 and 3 — more disease-resistant, better suited to high-rainfall zones.
- Kabode (Kabonde) — a widely grown traditional variety with distinctive, antioxidant-rich purple flesh, popular in Western Kenya.
- Vitaa, SPK004, KEMB 36 — orange- and yellow-fleshed varieties bred for both yield and weevil tolerance.
- KC-Sweet Purple — a newer, climate-resilient, purple-fleshed variety particularly suited to drier eastern zones like Makueni, Machakos, Kitui, and Tharaka Nithi.
Planting season: The long rains (March–May) are the standard planting window for rain-fed growers. With reliable irrigation, planting can continue through the year.
Typical yields: Well-managed farms commonly report 4–12 tonnes per acre on average, with top-performing farms using improved varieties and good practices reaching considerably higher.

Orange-fleshed varieties are specifically promoted by KALRO and CIP for their high vitamin A content, making them a strong choice if nutrition — not just yield — is part of your goal.
Frequently Asked Questions
Can I grow sweet potatoes from a store-bought potato? Yes, as long as it hasn’t been treated with a sprout inhibitor (organic sweet potatoes are a safer bet). Follow the water-jar method in Step 1 to generate slips.
How many sweet potatoes does one slip produce? A single healthy slip typically produces several tubers — often 3 to 6 — by harvest time, depending on variety, spacing, and growing conditions.
Do sweet potatoes need a trellis? No. Sweet potato vines sprawl along the ground rather than climbing, so no support structure is needed. Give them room to spread.
Can sweet potatoes be grown in containers? Yes, in large containers (at least 5 gallons / ~20 liters) with good drainage. Yields are typically smaller than in-ground plantings, but it’s a workable option for limited space.
How do I know if my soil is right for sweet potatoes? Loose, sandy loam that drains well is ideal. If your soil is heavy clay, consider planting in raised mounds or beds to improve drainage and give tubers room to expand without obstruction.
Once your sweet potatoes are ready, see our Recipes section for ideas, or check current Market & Prices if you’re growing for sale rather than just the kitchen.